10.29.2009

November giveaway/guestblogger #3


Here is our third giveaway for our month of small handmade gifts - Mix it up Cocktail Toasters by Sew Mama Sew


use this:


to make this:


What you get:

assorted fall fabrics - enough to make 6 matching coasters
batting for the inside of the coasters

This should be everything that you need to make these coasters.

What you do for us:

Make the coasters and post about the process and any other sewing tips as our guestblogger during the week of November 22nd.

If you want to enter this giveaway just leave a comment on this post telling us who you are making this gift for (even if it is yourself). It closes Saturday at midnight.

p.s. don't forget about our other two giveaways currently going on - week #1 and week #2

10.28.2009

November giveaway/guestblogger #2


Here is our second giveaway for our month of small handmade gifts -Heather Bailey's Headband


use this:


to make this:


What you get:

1/8 yard of 2 amy butler fabrics

(enough fabric to make two headbands)

What you do for us:

Make the headbands and post about the process and any other sewing tips as our guestblogger during the week of November 15th.

If you want to enter this giveaway just leave a comment on this post telling us who you are making this gift for (even if it is yourself). It closes Friday at midnight.

p.s. don't forget about our other giveaway going on for week#1!

10.27.2009

Quarantined Costumes


So, what would you do if you were quarantined in your home for seven days with the suspicion of swine flu? I spent the first day wrapped around the toilet unsuccessfully keeping the Tamiflu down. This morning, start of day two, I am feeling much better and decided to finally cut out my daughter's Halloween costume. Last week we had the stomach flu and had decided to give up and buy hers. Unfortunately I didn't act on that prompting soon enough because I am now not allowed to be in any public settings until the day after Halloween and out of the four of us she is the only one who has somehow escaped the ravaging pig. She asked to be a fairy, no particular one, thank goodness, as I have a lovely coral-pink bridesmaid dress waiting to be refashioned into this:
I finished cutting out the pattern and started sewing the petals when my energy gave out and I decided to let you all know I hadn't totally fallen off the earth, although my pillows may have, we'll see what tomorrow brings. Regardless, there will be one more fairy in the world this Halloween. Our son, on the other hand, has a great pirate costume, home sewn, and ready to go...around our house. I should have know, he was born in the year of the pig.

November giveaway/guestblogger #1


Here is the first giveaway to start off our month of small handmade gifts - the perfect box pouch by Indie House.


use this:

to make this:


What you get:

approx. 1/8 of a yard of Echino fabric
approx. 1/8 of a yard of mustard yellow linen
medium weight non fusible interfacing
1 - 12 inch turquoise zipper

This should be everything that you need to make this adorable little bag.

What you do for us:

Make the bag and post about the process and any other sewing tips as our guestblogger during the week of November 8th.

If you want to enter this giveaway just leave a comment on this post telling us who you are making this gift for (even if it is yourself). It closes Thursday at midnight.

10.23.2009

WITH SCRAPS: Little House Doll Quilts


This great idea came to us via a comment from reader Megan Anne, who in turn got the idea from the blog See Katie Sew. If you are looking for something to do with the leftover scraps from your pillows this is a great one. Plus, it would make a great Christmas gift for a daughter or niece. Go here for Megan Anne's take on the project (seen above) and here for Katie's tutorial on making the little house - doll quilts (seen below).Have a fun idea for using up your scrap fabric? Email us at dearpresserfoot@gmail.com

10.21.2009

Pillow Forms


For those of you who plan to make pillows according to the pattern directions, you'll have noticed by now (I hope) that almost all of the different pillows call for a pillow form in the notions section. If you've then taken the next step to price and or purchase these forms, you'll have also realized that even with Jo-Ann Fabric having them on sale buy one get one free, they are expensive. Well, I'm here to solve your budget worries. :-)

A pillow form is really easy to make and all you need are needle, thread, muslin (I love muslin) and polyfill (Or some other filler material) - super easy, and polyfill is also on sale buy one get one at Jo-Anns.

Step 1)
Determine the size you need your final pillow form to be (mine is a 14 inch form) and add half an inch to the total measurement and cut two pieces of muslin in your desired size. So for my 14 inch pillow form I cut two squares 14.5 inches.

Step 2)
Making sure your fabric is right sides together, pin around the edges of your shape to keep the pieces in alignment and then sew around the edge using a quarter inch seem allowance. Be sure to leave at least a three inch gap in your stitches to allow you to fill the form and backstitch at the beginning and end of your stitches to reinforce them.


Step 3)
Turn your form right side out and use a turning tool (my favorite is a chop stick) to poke the corners out nice and crisply.

Step 4)
Now is the fun part, get your polyfill and start shoving it into the form until you've reached the desired level of poof.

Some people will tell you that if you put it in using smaller amounts rather than large handfuls it won't be as lumpy over time. I have yet to find that true, especially after a washing or two, but feel free to believe whomever you'd like.

Step 5)
When you've filled your form as full as you'd like it, carefully turn the edges of your fabric in at the opening and pin the gap closed.

Then you need to carefully top stitch the opening closed, or if you wanted to, you could hand stitch it using a whip stitch. I went for top stitching, since it's just a pillow form, it doesn't need to look 100% awesome, so the three inches of top stitching were fine for me.

And, tah-dah, you've got yourself a pillow form. And I promise it only cost a couple bucks tops.
Now you're all set to make your covers for them, and get them on your furniture for the world to admire.

10.17.2009

November = Small Handmade Gifts

For our pattern project next month I decided to do things a little bit differently. I am a big fan of homemade gifts, so I thought that November would be the perfect time to get an early start on making some of those. (As opposed to staying up all night on Christmas Eve finishing unfinished projects.)

So, instead of buying a pattern for a large project in November we are going to make three small projects, all of which could be used as gifts for the holidays, and all of which are free patterns found online.

Here are the three projects we will be doing. So be looking through your scrap bags for the perfect fabrics for these projects and for the perfect person to make them for (or just keep them for yourself).


week 1 - The Perfect Box Pouch by Indie House
week 2 - Heather Bailey's Headband
week 3 - Mix it up Cocktail Toasters by Sew Mama Sew

Also, we will be doing something a little different with our guest blogging / monthly giveaway. We will have three small giveaways, and three short one week guest bloggers. Look for the giveaways starting early next week.

10.15.2009

Placement by guest blogger Courtney


One of the first things that needs to be determined when looking at/for pillows is where they are going to live after you've made them. The logical place most of us would think of would be the living room, on the couch or chair, but there are many other places to toss your newly completed pillows, such as the bedroom (master, guest, or children's) the play area or movie/TV area - this is a great place for some larger pillows that can be used on the floor, or even in the car. Growing up my mom always had a couple of smaller throw pillows in the
van so that we had something to lay our heads on if we
wanted to sleep during car trips.

Personally I plan on replacing/redoing the cushions for my couch.


Making some for my bedroom -
I love the chocolate brown and khaki color combo, but it's rather monochromatic, I mean even my cats blend in for goodness sakes. (Please ignore the weird black and white tile pattern, it came with the house and we are saving up to put in hardwood.)


And I'd like to make a pillow for my daughters crib, the one we got her from Ikea is kinda sad looking and grungy. I'm hoping to start a few so that when she's ready for her "big girl bed" in a couple months, I'll have a fun collections of pillows to put on it.


So, where are you putting your pillows?

Courtney

10.13.2009

Pillow Talk


I have been perusing the intranet for modern pillows that I can use as inspiration for redoing my own pillows.
Here are a few that I have been thinking about recreating. I think they are doable and I love all of the texture.
1- CB2
2- Crate and Barrel
3- Pier 1 (found on Imaginary Shopping Spree)
4- CB2
5- CB2

What are you guys thinking?

10.11.2009

OLD THINGS MADE NEW: T-shirts into Pillows

Some favorite T's from a trip you took might look lovely on your couch. The T-shirt your 4 year old just can't let go of even though it shows their belly button could be hugged and cuddled on their bed. And remember the onesie you adored on your baby? Why not make it into a tooth fairy pillow for your growing little one.

Here's some great instructions from doityourself.com to take beloved t-shirts into pillows. The below instructions come straight from their site.


If you won’t wear those T-shirts again why not turn

them into throw pillows? A T-shirt with a nice design will make a lovely pillow sham. The best part is that some of the work is already done for you.

Materials

  • Old T-shirt
  • Sewing machine
  • Taylors chalk
  • Scissors
  • Pillow or stuffing
  • Zipper

Pick a T-Shirt

Choose a T-shirt that you want to use and check it for tears and stains. As long as the T-shirt is sound and clean, it can be used. You can create memories and talking points by choosing T-shirts with images or messages on them. If this is your first attempt you can practice on a plain T-shirt.

Check the Size

If the T-shirt is not a large size it is possible that you can use the body width as it is. If you are using an existing pillow to stuff the new sham then the size of that pillow will be taken into account.

Turn the T-Shirt Inside Out

With the T-shirt inside out check how much of it you will want to use to make your throw pillow. Mark lines to show where you want to cut the T-shirt. Make sure that you do not mark the lines through any images that you want to save.

Sew Along the Lines

The cutting lines you have marked will become the seams for your pillow sham. Sew along the one near the top of the T-shirt with a sewing machine taking care to keep the material flat. This isolates the head end so you can cut it off and make the material easier to handle.

Make the cut about ½ inch from the stitched line. If you have marked lines down the sides of the T-shirt, sew along those. Cut the surplus material away, again about ½ inch from the stitched line.

Fill the Sham

You have created a sham with one end open. Turn the sham the right way round by pulling the closed end through the open end. You should now see the images that you wanted to save nicely centered on the sham. You can place a pillow inside the sham or fill it with stuffing material.

Close the Open End

Turn the edges of the open in to the center by about ½ inch, more if possible. If you want to fit a zipper to make removing the sham easier, you can do that now. Remove the pillow or stuffing to make use of the sewing machine possible. Use a zipper that is closed and fixed at one end. Sew the zip in place so that the teeth are below the level of the fold. If you are not using a zipper, you will have to close the end with hand stitching.

10.09.2009

Progress Report


Oh, you guys, I am such a terrible guest blogger! Well, I'm not great at keeping up with my own blog either, in all honesty. Though really, I had high hopes and grand plans for this maxi dress project. My last post (oh, so long ago! but so many good ideas.) alluded to the time issues we all face, but I ran into another issue, namely what to do when you actually find the time to work. You clear a Saturday, you brew coffee and start working bright and early, you spend six hours sewing, and at the end... this.

So close

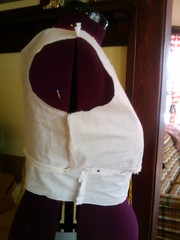
That right there is my muslin. Well, my first muslin. I'll definitely have to make another one. I thought I got everything right when I altered the pattern (though in all honesty I had a feeling that the fit was a bit off), but as you see, once I put the two sections together to pin, my side seams ended up off by about 2 inches. Oh, ladies and gents (I insist on maintaining the belief that there are men out there reading sewing blogs!), what a feeling of crushing defeat. Though really, maybe crushing is not the right word. I was incredibly frustrated that I'd spent an entire day making a muslin that ended up being complete crap, I realized right away that not only had I ruined sale-price muslin (so maybe $2 a yard?) rather than my lovely amazing fabric, I also learned so, so much.

I'll start with the alterations I mentioned. First lesson, tracing paper is great for sewing patterns. Since I was altering a commercial pattern for the first time, I traced the pattern (markings and all) onto tracing paper, cut out those pieces, and did my alterations on the tracing-paper copies. Possibly overkill if my alterations had been correct, but since they weren't, I still have pristine versions of the real pattern pieces.

Second, alterations are hard! For my (failed) muslin, I did a full-bust alteration, and I added about an inch of width to the midriff piece. Wait, actually, I added an inch to the front piece; for some reason, I decided not to add any width to the back. One of the things that I figured out was that you really do need to make sure that you're adding/subtracting the same amount everywhere. I don't know why I didn't believe it when I read it at least eight times during the alteration-planning, but learn from my mistake, and alter carefully and evenly.

Third, it really is worth the time to have someone else help you with measurements. I have not actually done this yet, but once my oh-so-carefully measured bodice muslin did not fit at all, I finally admitted that 'mostly accurate' will not cut it when sewing garments, especially with anything more complicated than an A-line skirt.

Fourth, it's probably worth it to do a fully-lined muslin of the bodice. Or of any similar garments that are lined. Once I saw my poor mismatched seams, I realized that my decision to do a modified muslin with an unlined bodice was a bit doomed anyway, as the fit wasn't going to be the same, what with sewing extra seams and all.

Oh goodness, there are probably more lessons, but I am afraid I'm not even making sense anymore. My students have a midterm next week, so I spent this week's classes reviewing material, and at the end of so many explanations, I had this sinking suspicion that I'd just confused them more. I guess what I will say is that Kelli's post was quite a comfort to me. I wanted so badly for this project to go well, so I'd have super useful and hilarious blog posts for you all, but everything just seemed to go wrong. School was just ridiculous, I was all thumbs whenever I did have time to sew, and oh, seriously, that muslin failure is going to be bothering me for months.

And to top it all off, I had to go away last weekend for my grandma's burial. I talked a little bit about her here. She died almost two years ago, but for a few different reasons, we weren't all able to make it up north to the family cemetery until now. Before I left, I was so confident that I was done grieving that I brought tracing paper & a measuring tape so I could enlist my mom's help in having another go at the pattern. I was quite wrong. I hate to bring that up here, as this lovely blog is such a happy place, but one thing that I realized is that sewing keeps me connected to Grandma every single day. And I think what's really amazing is that sewing serves that purpose for so many people, of keeping them connected to family and tradition and a wider community of sewers. Kelli & Rian, our lovely and oh-so-patient hosts, are proof of that. I can think of so many of my crafty friends that learned how to sew (or knit, or crochet, or whatever) from their mom or grandma. Sewing is one of those things that holds us all together; it's a vehicle for passing down not just sewing technique, but family traditions, and it something that connects each individual sewer to a wider crafty community.

And I will stop here before I cross over from sincere to maudlin. I will just say, this will be my last post of the Maxi Dress sew-along, though I will likely update you when (not if!) I finally finish my dress. I have enjoyed it so much, and this has been such a great introduction to this whole group blog, sew-along thing. Presserfoot is such a cool space, and I'm psyched to be a part of it.

10.08.2009

Pillow Fabric


Here is my fabric! I am really excited because I have been holding on to the yellow bird fabric for a long time. I saw it on line and loved it, so I bought it. Then it sat in my stack of fabrics waiting for me. The colors pull from a family picture collage that hangs above my couch. A few weeks ago my older sister (Kelli is my younger) was kind enough to watch my kids while I went fabric shopping at a quilt shop in her city. I knew I wanted some type of textured pillow and so pulled the white squared chenille from the baby section. The brown dots caught my eye just as I was about to give up. Sometimes it's hard to find amongst so many choices. And finally the green is a left over scrap from a prototype I was sewing for a company many moons ago. I'm planning on using the green for an applique on the brown dot fabric to add a little interest. Any suggestions on what to applique?

10.06.2009

Ugly Pillows


So today I took a trip to the local thrift store and bought two horribly ugly pillows to cover. Coming in under $5, they felt like a steal (well because I knew their potential). So here you go - a nice before picture. Arn't they ugly?


Stay tuned for the transformation.

10.05.2009

Hi from Courtney, October's Guest Blogger and Giveaway Winner

We are pleased to introduce Courtney, the winner of our October giveaway and guest blogger of the month. We asked Courtney a few questions to help us and all of you get to know her.

How long have you been sewing and who taught you?
I originally learned how to sew in elementary school and was taught by my Grandmother. Sewing has always been a big part of my life growing up, when I was younger my grandmother sewed a large portion of my wardrobe and lots of matching dresses for my cabbage patch doll. :-) After she passed away and I grew older, my mom took over the reigns and the sewing machine and sewed almost every dress I wore to any high school dance, including prom. After that, she sewed my wedding gown and most of the dresses for my wedding party as well. It was fitting of course, that my wedding gift from my parents was a sewing machine - an almost identical (although 30 or so years newer) to the one of my Grandma's that I learned to sew on.

Sadly it wasn't until the last year or so that I've actually been an active sewer. However, now that I've picked it back up (and am relearning a lot!) I am hooked - I have a bigger stash than both my mom and Grandma put together and I'm usually at my machine at least once a week. However, with a two year old daughter running around it's sometimes hard to actually get in the time I'd like and I consequently have MANY half finished or not even started projects laying around my sewing area (including my apron from the sew a long months ago)

Can you remember the first thing you made?
I can't remember the first thing I sewed by machine (although I do remember learning with the help of a book my Grandma got me where you sewed right onto the pages of the book and followed their stitch lines. That's how I learned how to make 90 degree turns) but the first thing I remember sewing ever was a small pillow in my girl scout troop in elementary school.

What is your favorite and least favorite part of sewing?
My favorite thing is the finished project - although being my own worst critic and a perfectionist I never seem to be 100% happy with the end results. Being able to hold something in your hands and say "I made this" though is always an amazing feeling that never gets old - bonus if you get compliments on it later.
My least favorite is all the prep work - gathering supplies and notions, washing the fabrics, that sort of thing. Oh and the fact that my machine is rather temperamental has been known to bring on the occasional nasty mood and even a stream of curse words on rare occasions.

When you are not sewing what do you like to do?
My daughter, husband and all our pets (3 cats, 2 dogs, hedgehog, 4 snakes, and mouse population) keep me rather busy. Outside of sewing and family though I'm still an avid crafter - you name it I'm at least willing to try it. I love to color and create with paper and I used to draw/sketch and paint a fair amount although I don't seem to find the time for that as much anymore. I'm also really involved in my Church including a weekly morning bible study and am the creative activity coordinator for our MOPS (
http://www.mops.org) group. I also enjoy books and while I love to sit and read that is a hobby I don't get to pursue often, but I do listen to audiobooks a lot.

Tell us a little about your blog.
I actually have two blogs - one of them (
daughtersofeveetsy.blogspot.com) is where I put all my creative endeavors and any support or announcements for my etsy shop (which has been woefully neglected as of late). I post things I'm working on or have finished recently, how tos for various things including the creative activity for our MOPS meeting each month, as well as posts from other blogs that I find motivating, helpful or inspirational.

I also have a family blog that I keep updated with day to day type information, I post our weekly menu plans, pictures of our family, the progress of my diet, you name it related to our everyday existance.

Tell us a little about your business.
I run an etsy shop - but as previously mentioned it's been pretty neglected lately. I sell a wide range of items from jewelry to burp cloths and even pet toys. Feel free to check it out kaugomu.etsy.com


10.02.2009

Thrift Store Pillows


If you shop at a thrift store like this:

Then you are likely to find pillows like this:
(only not so bright and nice looking)
Buying thrift pillows is a great way to reuse and keep your costs down, but there are a few things you should know.

Buying
1. existing trim doesn't matter, but do buy the size and shape you want.
2. existing color only matters if you will be recovering in a light colored fabric, but you can always strip off all the existing fabric and make a simple muslin form
3. smell does matter! specifically cigarette smoke. you will be washing your pillows before use while will take out almost any musty smell, but cigarette smoke will only intensify in the drying process. so, before you buy, take a whiff.

Washing and Drying
1. add a scoop of oxy-clean or other like cleaner to your detergent
2. I like to wash them on hot just to be safe
3. dry them with a tennis ball in the dryer, the ball will help beat out the internal wetness and fluff them.
4. re-cover and enjoy your awesome new pillows.

Any questions?

10.01.2009

A little pillow inspiration


As we get started on our pillows this month remember the sky is the limit. Think about fabrics with different textures, appliques, trims, block prints, layering,...the list goes on and on. Pillows can be for chairs, couches, beds, benches, or even the floor. What accessories do you love in a room? Look for punches of that color in the fabrics you choose. If putting together different prints is hard for you look at one specific line from a designer and stick to those choices. But, if you love variety grad one fabric you like and go on a hunt through the store (online or in person). And remember this is a great time to reuse pillows you already have for buy some from a thrift store. Reuse. Re-cover. Reinvent!