

 How to make a Nautical Headband
Materials:
-4 yds of rope or ribbon cut into 4 equal strands
-1/2 yd 1 inch twill
-hair band
-sewing needle
-thread
 The following pictures show you step by step how to make the sailor's knot with your first two strands of rope. Pay careful attention to which strand is on top or under the other. For more help click here.

 Now take your third and fourth strands of rope and snake them side by side into the knot by the first two strands.
 Slowly pull the knot tighter, keeping it even and the knot flat.
 Here is a closeup of how the knot should look now.
 Take your needle and thread and about 1 inch from the knot sew together the four strands of rope to keep them flat on the back..
 Repeat on the other side.
 Here is the front.
 Trim your ropes so that all of the ends are even and the whole thing is about 19 inches long with the knot at about 7 1/2 inches (so that it is on the side of your head).
 Cut two pieces of twill at about 3 inches.
 Using your sewing machine or your needle and thread sew both of your ends flat.
 On the shorter side of the headband (closer to the knot) and on the front of the headband, line the edge of the twill with the end of the rope and sew with your sewing machine at 1 inch from the edge.
 Fold the twill down over the stitch line and flip the headband over so you are seeing the back. Place the hair holder inside of the twill tape as shown.
 Fold at about 1/4 inch.
 Now fold up so that the folded twill tape covers the stitch line.
 Sew this edge down as well.
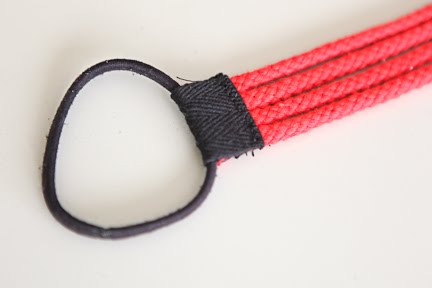 Try on the headband to see if you need to take any length off. If you do then trim off a little rope before continuing. Now repeat the previous steps on the other end of your headband (the longer side). In the end it should look like this.
 Here it is on.
 Isn't it great? I want to try something similar for a belt as well. I will show you when I do. Enjoy making your own now.


This is such a cute idea! You make it look so easy. Thanks for showing how to make it.
ReplyDeleteI will definitely make one of these. Thanks for the great tutorial!
ReplyDeletei love this!!! really, this is very awesome.
ReplyDeleteThanks for sharing--I love it, too!
ReplyDeleteIt's very nice. Thanks for the tutorial.
ReplyDeleteThat came out really cute and you explained that knot so well! Thanks so much, I'll be linking.
ReplyDeleteAbsolutely love this. Found you via one pretty thing. So glad I did!
ReplyDeleteThis is really great! I would totally make one but headbands always give me headaches ;\
ReplyDeleteThis is so easy and lovely! I made myself a bracelet, so you dont even need to make a headband :) I love its simpleness
ReplyDeleteIt's great idea! Thank you for sharing.
ReplyDeleteI made a bracelet too, it looks really nice!
i'm sure it's not the last one ))
Greetings from Germany,
Larissa
Omg I have been looking to do this knot like forever. And I even have a book of knots. Where did you learn to do it? if you dont mind answering
ReplyDeleteThank you very much.
Eli...
Hi,I really love this look.Nice summer beachy look.
ReplyDeleteI love knots!!! this one I will have to make! Thank you for sharing!
ReplyDeleteI love all things nautical themed, thanks for sharing
ReplyDeleteThank you for sharing this! I was wondering would you be able to tell me where I can get this kind of rope?
ReplyDeleteThis is so nice and simple,
ReplyDeletesend gift to pakistan from USA
Just linked to you http://tempestahoy.blogspot.com/2011/09/nautically-embellished-polos-mini.html - LOVE this!
ReplyDeletelove it. Great tutorial, thanks for sharing.
ReplyDeleteThanks so much! My bridesmaids will be wearing these!!
ReplyDeleteawesome! have been looking for instructions on how to make these headbands but with pictures insteadof just written directions!!
ReplyDelete-Thanks!
Beautiful!!! Thanks for the tutorial :)
ReplyDeletethank you for showing me this pinterest.
ReplyDeleteIsn't this Cami's (youseriouslymadethat.blogspot.com) idea? did you copy it?
ReplyDeleteyou know its funny, but i came across her post about a year after i made my post (although i think cami's was actually posted first). all i can say is that good minds think alike:) in fact i have seen other similar tutorials before either of ours came out. i think it's inevitable in the world of blogging that there are repeats - especially when there are fads such as nautical. this isn't the first time this has happened. in fact if we want to talk about copying we both copied something that we saw in a store - mine was from urban outfitters. oh well. it just happens. i think it's good though that you are looking out for your friend.
DeleteHi love love love this and will probably have my bridesmaids wear for my nautical themed weedding. Can you tell me where to look for the rope? I've looked everywhere and can't find it!
ReplyDeleteThanks!
I found mine at JoAnns in the trim by the yard. I would look online as well if you are having a hard time finding it. Good luck! and Congratulations!
DeleteJust made this today for my daughter to go with her DIY tank maxi dress I made.....turned out SO cute! Thanks for such clear and easy directions!
ReplyDeleteHello
ReplyDeleteI would like to create a nautical bracelet that my boyfriend loves for his birthday. Do you think you could reproduce it ?
Your price will be mine
thanks a lot for your help
best regards
julie
Thanks for the tutorial. Really loves the outcome.
ReplyDeleteThis was so easy to make. I used boot style shoe laces I had around the house. It was done in no time at all.
ReplyDeleteDo you really need 4 yards of rope to make one?
ReplyDeleteThis is truly a great project for just about anyone! Although I suggestnot making the yarn quite so long, because you dont really need it. I started out with only 2 feet and still had to trim quite a bit off! But it was a great experience learning tomake somthing new!!
ReplyDeleteHi, where did you get the rope ? I think it's a great idea.
ReplyDeleteBeautiful. Love the red rope. WHere can I find red rope?
ReplyDeleteI love it! Thank you for the tutorial.
ReplyDeleteVERY NICE WORK, ALSO, IT IS VERY EASY TO MAKE. I WILL!
ReplyDeleteThank you.
very interesting concept
ReplyDeleteNice Post...thanks for sharing this information....If anyone looking for best headbands online. visit kooshoo.com..
ReplyDeleteSuch a cute, creative idea for a headband--LOVE it! I have two daughters, so headbands are in high demand. I'd love to make these in different colors to match some of their summer outfits. Thanks so much for sharing--found your cute project via Pinterest. :-)
ReplyDeleteLooks like one of those vintage headbands. Very pretty and simple. These headbands look nice and trendy.
ReplyDeleteThank you! I just made these for my 3 little girls to wear tomorrow. They turned out way cute and didn’t even take an hour to make 3 of them. Thanks again!
ReplyDeleteThanks for such a great tutorial...this is so cute and I will definitely make this.
ReplyDeleteOne question: the length of the rope. 1 yard seemed too long to me, do you use 1 yard on purpose? Should I measure my head and then cut the rope?
Please help!!!!!
Super cute idea. Gonna give it a try. Thanks for posting this headband DIY instruction.
ReplyDeleteThe design of DIY headband is so gorgeous!Thank you for sharing this impressive tutorial!DIY accessories making tutorial.
ReplyDeleteThanks for this article very helpful. thanks. Skjerf
ReplyDeleteThanks. I made this and it turned out fab. Thank you for sharing.
ReplyDeleteIt's really a beautiful diy project.
ReplyDeleteGreat article, thanks
ReplyDeleteKattehus
I would like to thank you for the efforts you have made in writing this article. I am hoping the same best work from you in the future as well. In fact your creative writing abilities has inspired me to start my own BlogEngine blog now. Really the blogging is spreading its wings rapidly. Your write up is a fine example of it.
ReplyDeleteריצ'רד טוויל
I had been honored to obtain a call from a friend as he found the important guidelines shared on the site. Browsing your blog post is a real wonderful experience. Thanks again for thinking of readers like me, and I hope for you the best of achievements as being a professional discipline. Unique Dofollow Backlinks
ReplyDeleteso good information thx sir.
ReplyDeleteVenüsbet Venüsbet Grandbetting Grandbetting Hiltonbet Betnano Marsbahis Meritking Asyabahis
I just want to thank you for sharing your information and your site or blog this is simple but nice Information I’ve ever seen i like it i learn something today. Betnano giriş
ReplyDeleteThank you for giving me a chance to read this wonderful article. Thanks a lot! Indian e visa online for foreign nationals. India e visa online is an online travel authorization to travel to the country for tourism / business/medical/conference purposes. Foreign nationals can be apply e visa Indian online. You can find out all the information about Indian Visas through our website.
ReplyDeletesmm panel
ReplyDeleteSMM PANEL
İş ilanları blog
İNSTAGRAM TAKİPÇİ SATIN AL
Hirdavatci burada
beyazesyateknikservisi.com.tr
servis
Jeton hilesi
Thank you for giving me the opportunity to read this wonderful article. Thank you so much! If you plan to visit Turkey, then an electronic visa for Turkey may be the best option because of its ease of application and time and cost savings.
ReplyDeleteI read your article last night and it's so amazing. I have shared it with my friends. I hope you will publish more articles like this. People who are willing to travel to Turkey. They can apply for a Turkey e visa from the website. You need an internet connection and valid documents. Travelers can apply from anywhere in the world.
ReplyDeleteVery nice post. I just came across your blog and wanted to say that I love browsing your blog posts. e visa online, E Visa application process now is online. You can e visa apply online within 5 to 10 minutes you can fill your visa application form. And your visa processing depends on your nationality and your visa type.
ReplyDeleteGood content. You write beautiful things.
ReplyDeletehacklink
vbet
hacklink
korsan taksi
mrbahis
vbet
mrbahis
taksi
sportsbet
Good text Write good content success. Thank you
ReplyDeletetipobet
kibris bahis siteleri
poker siteleri
betmatik
slot siteleri
bonus veren siteler
kralbet
betpark
kralbet
ReplyDeletebetpark
tipobet
slot siteleri
kibris bahis siteleri
poker siteleri
bonus veren siteler
mobil ödeme bahis
betmatik
36Y
Normally I do not 먹폴
ReplyDelete, nice share. 파워볼
ReplyDeleteIts a great pleve been searching for. You have a clever yet attractive way of writing. 토스맨
ReplyDeleteThe information you supplied is very helpful to us. I appreciate you giving this knowledge. Obtaining certain visas can be a daunting and challenging process, with some being notably more difficult to acquire than others. These Difficult Visas To Obtain are typically associated with stringent eligibility criteria, complex documentation requirements, and limited visa quotas.
ReplyDeleteI thoroughly enjoy your posts; they are engaging, insightful, and an absolute delight to read. Mexican citizens can obtain a Kenya Visa for Mexico, allowing them to explore Kenya's stunning landscapes, wildlife, and vibrant culture. Embark on an unforgettable African journey!
ReplyDeletesalt likit
ReplyDeletesalt likit
VBO
I really hope you all are doing well and enjoying life to the fullest. I thank you so much for your unmistakable generosity in sharing this kind of invaluable information. Bonjour, Cote D'Ivoire travelers! Dreaming of India? India eVisa Requirements for Cote D'Ivoire – you can apply for an e-Visa online. Whether for tourism, business, or medical purposes, this digital visa is hassle-free. Just ensure your passport's got six months' validity, have a recent photo, and a payment method for the processing fee. Get ready for an amazing Indian adventure!
ReplyDeleteresimli magnet
ReplyDeleteresimli magnet
çerkezköy çatı ustası
silivri çatı ustası
dijital kartvizit
TTBD
Your captivating and insightful content is truly valued. Keep up the fantastic work you're doing! Obtaining an Egypt visa for India citizens is a straightforward process. Applicants need to submit necessary documents, including a valid passport, application form, passport-sized photos, and fee. The visa allows Indian citizens to explore Egypt's rich history and vibrant culture.
ReplyDeleteHello! Your content is both captivating and valuable. Looking forward to more of your contributions in the times ahead. Explore Turkey hassle-free with a Turkey holiday visa. Immerse in rich culture, stunning landscapes, and historic wonders. Obtain your Turkey holiday visa to embark on a memorable journey.
ReplyDeleteVFS Global's UK visa tracking service in India offers a convenient and transparent way for applicants to monitor the progress of their UK visa applications. Whether you're applying for a tourist visa, study visa, work visa, or any other category, this tracking system keeps you updated at every stage of the application process. It provides peace of mind by allowing you to check the status of your application online, ensuring you are well-informed about its progress. In this guide, we'll provide you with easy-to-follow steps on how to utilize VFS Global's UK visa tracking service in India, making your visa application experience smooth and stress-free.
ReplyDeleteIt's wonderful that you're willing to share these with us. I'm enthusiastic about joining the event in the future, as this topic resonates with me. Symbolism and Significance of Passport Colors
ReplyDeleteYour website stands as an indispensable treasure trove of knowledge. It's truly exceptional. I eagerly await more content of this caliber in the future. Your dedication is deeply cherished. Russia Tourism in Crimea Declines Risk-Takers Persist. Tourism in Crimea became a divisive issue, with some countries advising their citizens against traveling to the region due to the unresolved conflict and the risk of instability. Despite these warnings and ongoing tensions, there were individuals who were willing to visit Crimea, often driven by curiosity, political beliefs, or business interests.
ReplyDeleteYour website is a goldmine of information. It's absolutely fantastic. I'm eagerly anticipating more posts like these from you. Egypt Visa Requirements Rules Egypt visa requirements are essential to understand before planning your visit. Travelers must check visa eligibility, ensure passport validity, and adhere to entry rules.
ReplyDeleteWithin the bustling online world, this blog post feels like a breath of fresh air. The author's perspective acts as a guiding star, illuminating the path through the complex subject matter. It's proof of their mastery at simplifying intricate concepts. I'm drawn back for more – undeniably enlightening!
ReplyDeleteWithin the extensive online realm, this blog post stands as a sanctuary of wisdom. The author's profound insights and captivating writing style transform each segment into a path to enlightenment. Every phrase is a cornerstone for deeper understanding. I excitedly anticipate every forthcoming post, knowing it will be another enthralling exploration of the captivating universe of knowledge. Maintain the outstanding work that compels me to return for more!
ReplyDeleteToday has been a wonderful day, and I'm so grateful to be reading this incredibly informative article at home. Your hard work is truly appreciated! UNWTO's backing fortifies South Africa's tourism data system. The UNWTO supports South Africa tourism data system to boost its effectiveness.
ReplyDeleteYour blog provides an exceptional journey through insightful content. The depth of your articles is truly commendable, leaving me engaged and inspired. Looking forward to more fascinating reads!
ReplyDeleteIt looks good. I have bookmarked it in my google bookmarks to visit then. Feel free to visit my website;
ReplyDelete
ReplyDeleteI’ll oftimes be once more to learn to read much more, many thanks that information
ReplyDeletewow, its a incredible information. thanks for sharing.
ReplyDeleteI must thank you for the efforts you’ve put in writing this blog.
Excellent and nice post. It will beneficial for everyone.
ReplyDelete
ReplyDeleteThanks for sharing such a wonderful post.
ReplyDeleteImpressive!Thanks for giving me an idea to my site
ReplyDeleteThanks for posting this educative write up
Greetings! I'm exploring your blog for the first time. We're a team of volunteers starting a community project in the same field. Your post was enlightening and thought-provoking. Continually reading content from different authors and implementing lessons from various websites is a valuable practice.
ReplyDeleteI derived immense pleasure from reading your essay! I'm genuinely excited to hear more about your travels and experiences. Thank you for your generosity in presenting this fantastic piece to us. It becomes even more advantageous when one seeks the finest quality. Your thoughtfulness in sharing is greatly acknowledged!
ReplyDeleteYour blog post is a captivating literary symphony, artfully blending intellect and emotion. The eloquence of your prose and the depth of your insights create a mesmerizing experience, resonating with readers on a profound level. Your unique voice adds a refreshing perspective, making this piece truly exceptional.
ReplyDeleteI am not positive where you are getting your info, however great topic.
ReplyDeleteI must spend a while learning much more or figuring out more.
ReplyDeleteThank you for fantastic information I was on the lookout for this info for my mission.
ReplyDeleteWe absolutely love your blog and find nearly all of your post’s to be what I’m looking for.
ReplyDeleteexcellent post, very informative.
ReplyDeleteEncountering fresh and thought-provoking material while casually browsing blogs is always a pleasure. Ordinarily, I skim through blog articles without much attention, but your writing has compelled me to alter that behavior. Your distinct writing style stands out, and I am thoroughly impressed by the ideas articulated in this article.
ReplyDelete"This article is a masterpiece! Your fresh perspective on the topic is truly inspiring. I couldn't tear myself away from it. Your knack for simplifying complex ideas is truly impressive. It's evident you've done your homework. The insights you offer are both eye-opening and actionable. I've already shared this with my colleagues—it's that good. Thank you for shedding light on such an important topic in such a captivating manner. I'll be eagerly awaiting your next piece.
ReplyDeleteIt's as though the writer plucked the thoughts I never voiced and gave them voice. Every word felt purposeful, sparking introspection and rejuvenating my resolve. This content prompted a deep dive into self-discovery and injected fresh vigor into my endeavors. Thank you for these profound insights, for they've reminded me that I'm not walking this path alone. Your words have offered solace and encouragement in abundance.
ReplyDeleteThank for you shared again.
ReplyDeleteNow I am found which I actually want. Thank you.
ReplyDeleteis still among the leading topics of our time.
ReplyDeletehjlkjklkgfhghjhgjkghk
ReplyDeleteصيانة افران جدة
تعتبر شركة كلينر من اشهر وأفضل شركات تنظيف الكنب بالرياض.
ReplyDeleteشركة تنظيف كنب بالرياض
<a href="https://elasraa.com/%d8%b4%d8%b1%d9%83%d8%a9-%d8%aa%d9%86%d8%b8%d9%8a%d9%81-%d8%a7%d9%81%d8%b1%
ReplyDeleteشركة رش حشرات بالاحساء Y7lwJnDfP7
ReplyDeleteشركة تسليك مجا
ReplyDeleteشركة تنظيف مكيفات بالاحساء U2qnm6Zati
ReplyDeleteشركة تسليك مجاري بالدمام odHgMANTvZ
ReplyDeleteشركة تنظيف مكيفات سبليت الخرج من أفضل الشركات المتخصصة في مجال النظافة وعملت على أن توفر إلى عملائها العديد من الخدمات التي من بينها تقديم مجموعة من النصائح التي تساعد في الحفاظ على سلامة المكيف وإطالة عمره الإفتراضي.
ReplyDeleteشركة تنظيف مكيفات بالخرج
maps.google.co.uk/url?sa=https%3A%2F%2Fbedigital.com.sa%2Fblogs%2F%D8%A7%D9%81%D8%B6%D9%84-%D8%B4%D8%B1%D9%83%D8%A9-%D8%AA%D8%B3%D9%88%D9%8A%D9%82-%D8%A7%D9%84%D9%83%D8%AA%D8%B1%D9%88%D9%86%D9%8A-%D9%81%D9%8A-%D8%A7%D9%84%D8%B3%D8%B9%D9%88%D8%AF%D9%8A%D8%A9
ReplyDeletehttps://directory-b.com/listings13040469/%D8%A7%D9%81%D8%B6%D9%84-%D8%B7%D8%B1%D9%8A%D9%82%D8%A9-%D9%84%D9%84%D8%AA%D8%B3%D9%88%D9%8A%D9%82-%D8%A7%D9%84%D8%A7%D9%84%D9%83%D8%AA%D8%B1%D9%88%D9%86%D9%8A
ReplyDeleteThe information you provide has helped me greatly. Thank you for your time & work.
ReplyDeleteI am happy to helpful information here within the article. Thanks for sharing.
ReplyDeleteI appereciate your work. I read your article every thing is clear, Thanks for sharing.
ReplyDeleteGreat Post! Im looking forward to seeing more from this blog here.
ReplyDeletevery great information same stuff as this great website D.
ReplyDeleteA very awesome blog post. D.
ReplyDeleteWe are really grateful for your blog post. D.
ReplyDeleteYou will find a lot of approaches after visiting your post. D.
ReplyDeleteI was exactly searching for. D.
ReplyDeleteThanks for such post and please keep it up. D.
ReplyDeleteGreat workD.
ReplyDeleteشركة تنظيف فلل بالقصيم YLhezWAsIA
ReplyDeleteشركة تسليك مجاري بالمبرز
ReplyDeleteDpftCbmRiQ
شركة تسليك مجاري بالاحساء
ReplyDelete5nnNZuiDlg
شركة الدمام كلين لتنظيف الاستراحات بالدمام توفر خدمات احترافية للحفاظ على نظافة واستقبال الاستراحات في المدينة مع التركيز على استخدام منظفات فعالة وآمنة وتوفير فريق عمل مدرب لضمان تعقيم وتطهير المكان بالكامل .
ReplyDeleteشركة تنظيف استراحات بالدمام
يبحث المواطنين في الرياض عن افضل شركة نقل عفش بحي العارض بالرياض speed way والتي تعد متخصصة في مجال نقل العفش والأثاث لمدة تزيد عن 20 عام، كما تمتلك أكثر من 100 سيارة نقل العفش في حي العارض والرياض متنوعة في المقاسات والأحجام لتلائم مقاسات كل القطع.
ReplyDeleteشركة نقل عفش بحي العارض بالرياض
Web development services help create websites that grow with you. Whether you want to add new products expand into different markets or integrate cutting edge tools a solid technical foundation means you will not have to rebuild everything from scratch. This kind of flexibility saves both time and money as your business evolves. custom website development services
ReplyDeleteكل الشكر والتقدير اعمال مميزة ايضاء تستحق شركة "ولاد البلد" التحية والتقدير على الخدمة المتميزة التي تقدمها في مجال الخدمات المنزلية. يُعزز الالتزام بالجودة والاحترافية من سمعتها كمزود أساسي للخدمات التي تناسب متطلبات الحياة الحديثة. مستقبل الشركة يبدو واعدًا، حيث تستمر في تطوير خدماتها وتوسيع شبكة عملائها، مما يجعلها الخيار الأول لعائلات كثيرة تبحث عن الراحة والموثوقية في خدمات المنزل.
ReplyDeleteولاد البلد خدمة المنزل
ولاد البلد الامارات
ولاد البلد قطر
ولاد البلد مصر
ولاد البلد البحرين
Металлические вводы обеспечивают надёжную фиксацию и защиту кабеля при вводе в корпус оборудования. Они подходят для промышленных и уличных условий.
ReplyDeleteI'm not trying to force myself to write, but I'm writing happy things becae I like you. That's how I naturally feel. I'm also emotional and excited. I'm gaining good confidence, too.
ReplyDelete