Showing posts with label wasp bag. Show all posts

3.06.2010

Wasp Bag - Keepsake Bag


I just wanted to share this with you. One of our readers ( we are going to keep it anonymous because it is a sensitive matter) recently had a friend's baby girl pass away due to heart complications. She was asked to make the family a keepsake bag where they could keep precious belongings that would remind them of their baby girl. Our reader decided to use the wasp bag to make it. I thought this was a really special and unique way to use the wasp bag and wanted to share.

Here is her keepsake (wasp) bag:

2.04.2010

Wasp bag - Diaper Bag Finished


Here are the photos of my finished wasp bag that I made to use as a diaper bag for my new baby. To convert the already wonderful wasp bag pattern into a diaper bag I enlarged the pattern by a couple of inches in width and height. I also added pockets on the inside of the bag to hold diapers, wipes, etc...


Here is the outside of the bag:


Here is the inside of the bag:

Overall I am pretty happy with how it turned out and look forward to using it.

2.02.2010

wasp bag: diaper bag pockets


Besides making the bag bigger, I also decided to add some pockets to the inside to hold diapers, bottles, pacifiers etc...

First of all I made a hanging pocket much like the original wasp bag suggests, just bigger. Here is how I made mine:

I cut three pieces of fabric from my red lining.
1 - 9 in x 8 in
1 - 9 in x 6 in
1 - 9 in x 3 in
Then I sewed the zipper into the two smaller pieces.
Put right sides together and sew around the bottom three sides at 1/2 inch seam allowance. I then used pinking shears to finish the edges.
Turn your pocket right side out and press.


The other change I made to the inside of the bag was that I added a row of elastic pockets to one side of the bag.

To do this I first cut an extra piece of lining fabric that was the same width as the panel on the bottom, but I angled the edges out to be about 2.5 inches wider on each side. The height of the pocket is up to you, but I made mine about 10 inches tall.

Here is a picture showing the original lining panel folded on center front on top of the pocket piece. As you can see the pocket wings out at the top to allow room for things to be put inside the pockets.
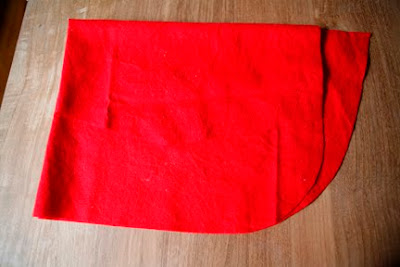
Now take your pocket piece and sew a hem that will act as a casing for your elastic on the top of the pocket piece. To do this I first folded the top over by 1/4" and then by 3/4". I sewed close to the edge to allow enough room for my 1/2inch wide elastic.


Insert your elastic using a safety pin. Cut elastic to desired tautness and secure by tacking both ends with your sewing machine. I made my elastic 2 inches shorter than the bags width. This way it was tight enough not to allow things to fall out.

Lastly, sew at 3/8" seam allowance with the wrong side of the pocket to the right side of the lining. It should look something like this:
At this point you may want to sew vertical lines to divide the pockets up into smaller sections which I ended up doing later on.

This is the end of changes I made to the wasp bag to make it diaper bag friendly. Check back to see my finished diaper bag.

2.01.2010

Holly : Assembly and the Final Results


We have all of our pieces, now it’s time to put them together! Start by pinning the lining to the inside of the inner top piece, with the lining and top right sides together.

Sew around the entire top with a 3/8” seam allowance. When you turn it right side out, it should look like this.

Next, we’re going to pin all of the ruffles on the bottom side of the top piece so they don’t get in the way.

Then pin the bottom of your bag to inside of the outer top piece with right sides together. Sew around the entire bag with a 3/8” seam allowance.

Turn your bag right side out through the opening in the lining.

Push the lining inside the bag. Remove the pins along the ruffles.

Now for the last step, topstich along the top ruffle seam to secure the lining to the inside of the bag.

And we’re done! Admire your new ruffled wasp bag.

It was so fun to be the guest blogger here on Presser Foot this month! Thank you Rian and Kelli for this opportunity. I enjoyed making this purse so much I made two of them. You can check out the results of my second ruffled wasp bag on my blog, bijou lovely.

1.28.2010

Holly : Pockets and Prepping for Assembly


Here’s how I made two pockets in my ruffled wasp bag, one open pocket and one with a zipper. For the open pocket, pin the right sides of the 8” x 6” pieces together.

Sew around the whole rectangle with a ½” seam allowance, leaving an opening for turning along the bottom. After clipping the corners and turning right side out, sew a double seam along the top.

To attach the pocket, center it within one of the purse lining panels and sew along the bottom and sides ¼” from the edge of the pocket.

For the zipper pocket, you can use this tutorial. It will make your results much prettier than mine, which I did without the tutorial. Looking back on this I definitely should have used yellow thread, but I didn’t have any and didn’t want to go buy some. Don’t make the same mistake! You can also sew in a label during this process.

When the pockets are finished, it’s time to sew the lining pieces together. Make your darts, clip the seam allowances, and press. Pin and sew the right sides of the lining together, and don’t forget to leave an opening in the bottom of the lining to turn the purse when we put it together! Press the seams open, baste in your pleats, and your lining is finished.

Finally, we need to sew the outer purse pieces together. Sew your darts and clip the seam allowance and press. These will give your bag a good base. Pin the pieces right sides together making sure your darts are aligned and sew with a 3/8” seam allowance.

Press the seams open, turn the bag, and baste in your pleats.

All that’s left to do now is assemble the bag and sew it all together!


1.25.2010

Guestblogger Holly : Straps and Ruffles


To make the handles for the ruffled wasp bag, sew the outer and inner lining fabrics of one strap right sides together with the quilted lining/interfacing on top of the two layers. I used a ½” seam allowance.


Turn the strap right side out (this part can be a little difficult) and iron the seams. Topstitch each side of the strap at a ¼” seam allowance. Repeat with the other strap.


Next, take the outer and liner top pieces of one side of the purse and pin the right sides together with the lining/interfacing on top of the outer fabric. Place the strap in between the inner and outer fabrics as shown (the outer strap should face the outer fabric of the top piece). If you want to reinforce your handles, leave 1” of the strap showing along the top on each side. Sew along the top edge using a 3/8” seam allowance.


To reinforce the handles, open the handle piece and sew a rectangle through the outer fabric, lining/interfacing, and the strap. Then sew an X in the middle of the rectangle. Repeat with the other side of the strap.


Repeat this process to attach the second strap to the other side of the top purse piece and reinforce the handle.

Next, take one of your 4.5” x 28” rectangles for the ruffles. Baste along the long edge of the fabric with your tension set to the highest setting using a 1” seam allowance. Make sure you leave long threads when starting and finishing the seam and do not backstitch. Repeat along the other long edge of the fabric. Your fabric should already be starting to ruffle due to the increased tension setting. Make more ruffles by pulling the bobbin threads on each side to gather the fabric.


When your ruffle is the same length as your top piece, pin the ruffle to the outer fabric & lining/interfacing so the top seam of the ruffle is about ½” from the seam attaching the outer fabric to the inner lining. Sew along each of the ruffle seams to attach the ruffle to the handle.


Repeat this process to make the second ruffle and attach it to the other handle.

Before sewing the two handles together, make sure to pin the ruffle on the corners in so they don’t get sewn into the seam.


Then pin your handles right sides together and sew along the short edges of each handle with a 3/8” seam allowance. Attach your snap to each side of the inner lining if you haven’t done this already and set the handle piece aside.


Next, we’ll add our pockets to the inside of the purse and then sew it all together!

1.18.2010

The Ruffled Wasp Bag – Cutting the Fabrics


Here are the changes that I made to the cut fabrics for my version of the wasp bag. If you need a refresher on the changes I’m making, read this post!

I didn’t make any changes to the pattern for the bottom of the bag, but I did iron my interfacing onto a thin quilted lining to give the bag a stronger base. Make sure the lining is pretty thin or it might be hard for you to sew the bag together!

For the tops, I didn’t make any changes to the pattern, but again I cut out piece of quilted lining and interfacing and ironed them together.


For the ruffle, I cut two 4.5” x 28” pieces of corduroy. At this size, it will fully cover the top band of the bag. If you don’t want your ruffle to fray, choose a fabric that resists fraying. I applied Fray Check along all 4 sides of my pieces just to be safe. I’ll show you how to make the ruffle in another post.


I opted for plain handles without the raindrop shape that are going to be attached to the inside of the bag, rather than sewing one side of each handle on the outside. I cut 4 pieces of 3” x 24” corduroy (one for the outer fabric and one for the inner lining of each handle) along with 2 pieces of quilted lining and interfacing of the same size to give the handles some structure. I ironed the interfacing to the quilted lining just like I did for the main bag fabrics.


I mentioned that I want to add a zipper pocket and another pocket to the inside of the bag for a phone, etc, so here are the dimensions I used for those pieces.

For the zipper pocket, I cut two 7” x 6” pieces each of the pocket lining and interfacing. I ironed the interfacing to the back for the pocket lining for strength and to prevent the flower print from showing through my purse lining. I had a 7” zipper on hand that I plan to shorten to 6”, so you can buy a 6” zipper instead to save yourself a step.


For the inner pocket I cut two 8” x 6” pieces of my floral fabric and two pieces of interfacing and ironed the two together. This pocket will show when you open your purse. (The pocket pieces in the pictures are bigger than they should be, I trimmed them down to 8” x 6” later so the pocket would fit well in the bag.)


So there you have it! If you’re planning to make a ruffled wasp bag, these are all the fabric modifications you need. If you have any questions I’ll be sure to answer them in the comments. Now, get cutting if you haven’t already!

1.16.2010

Cutting out and making changes


As mentioned before I want my wasp bag to be a diaper bag, so I decided to make it a bit bigger to accommodate all of the junk I will be storing in there. Here are the changes I made to the pattern as I cut out the front of my bag:


For the main body of the bag I made three changes.


1- I left about 3/4" in between the vertical x markers instead of matching them up. Because they were supposed to one on top of the other this should add an extra 1 1/2" to the length of the bag.

2- I also added width to the main body of the bag by adding about 3/4" to the area to the right of the center fold. Because this is placed on the fold it will also add about 1 1/2 " to the width of the bag.

3- I also cut off the triangle for the pleat on the top of the bag and moved it about 3/4" to the right. Because the bag was now going to be wider I wanted to make sure that the pleats weren't too far on the outside.

For the top placket of the bag I only made one change:

1- I added 3/4" to the inside fold just as I had for the main body (once unfolded it will add 1 1/2" to the width) of the bag so that the two will match up once sewn.

For the straps:

1- I wanted them to be thicker and longer so instead of using the pattern I just cut two strips that were 3" x 30". I will most likely make them a bit shorter later on.

2- I also decided not do the raindrop design at the end of the strap. I think I will just do a point, but am also waiting on that so we will see how it all looks.